I went through a lot of salt before I figured out what I was doing.
Table salt first. Then I tracked down actual Brazilian sal grosso, which is the traditional choice and genuinely good. Then kosher salt, which most American grill cooks already have on hand. Then one day I was running low on kosher and went looking on Amazon, half out of curiosity, and found soft flake salt.
I ordered some just to test it. I never went back.
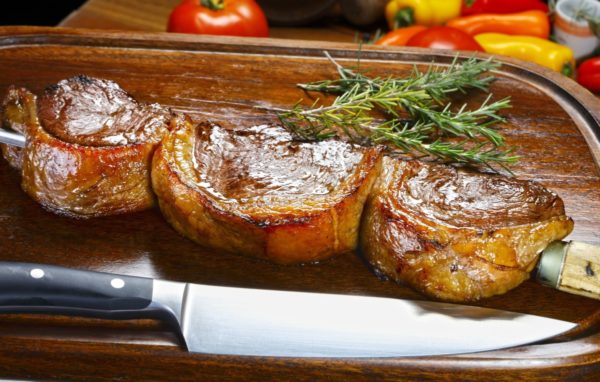
Flake salt has greater surface area than any other variety. It lands on the meat differently, sticks better, and creates a crust that is hard to achieve any other way. On a thick picanha over a hot fire, flake salt is something else entirely.
That is one of twenty years of small discoveries. Here are ten of the most important ones.
1. Match Your Salt to the Cut
Not every cut gets the same salt treatment. Here is how I think about it:
Picanha and fraldinha: Flake salt, applied generously before cooking. Thick cuts are forgiving. As the fat renders it sheds some of the salt, so do not be afraid to season boldly. The outside layers will carry the salt while the interior stays balanced.
Garlic sirloin cubes: Table salt works better here. The smaller surface area and the garlic rub mean flake salt can overpower. Fine salt distributes more evenly across the cubes.
Chicken thighs: I dry brine these. Salt them the night before and let them sit uncovered in the refrigerator. The first time I tried this I oversalted badly. The learning: less salt than you think for a dry brine, and give it the full overnight rest. The texture and moisture retention are worth the planning.
Bacon-wrapped anything: Do not salt the meat before wrapping. The bacon does the work. If you want just a little extra depth, a light pre-salt before wrapping is fine, but the meat does not need it.
Tip within a tip: This is how the gauchos cooked efficiently with large cuts. Sear the outside of the picanha until it develops a beautiful crust. Slice off that cooked exterior layer, re-salt the newly exposed surface, and put it back on the fire. Repeat until the entire cut has been served. You are cooking and serving simultaneously, slice by slice, which is exactly how traditional churrasco service works.
2. Build a Two-Zone Fire
This is the single most important structural decision you make before you cook anything.
I observed churrasco fires in Brazil for two years without understanding exactly what I was seeing. When I came home and had a churrasqueira built, I put thermometers in three zones and ran tests. The difference between the sear zone and the finishing zone was not subtle. It was roughly 100 degrees Fahrenheit.
That gap is everything. You need high direct heat to build a crust and you need lower indirect heat to finish the interior without burning the exterior. A single-temperature fire forces you to choose one or the other. A two-zone fire lets you do both.
Whether you are cooking on a dedicated churrasqueira or a kettle grill with a piece of rebar laid across it, the principle is the same. Set up your sear zone directly over your hottest coals. Your finishing zone should be 8 to 12 inches higher or off to the side with the coals moved away. Move your skewers between zones as you cook.
One more reason to keep the skewers moving between zones: fat dripping from the meat onto hot coals causes flare-ups. A flare-up that hits the meat directly can make it bitter. Rotating and repositioning keeps you ahead of that problem before it starts.
3. Understand Carryover Cooking, Especially for Cubes
The most common mistake I see with garlic sirloin and bacon-wrapped cuts is pulling them too late.
When you cut meat into cubes the surface area to mass ratio increases dramatically compared to a whole cut. More exterior surface means more heat has already penetrated inward during cooking. When you pull those cubes off the fire that heat keeps moving toward the center for several minutes.
The practical result: if you wait until the cubes look done they are already overcooked.
The right pull point is uncertainty. If you are asking yourself whether it needs a little more time, pull it. Tent it loosely and let it rest for three to four minutes. It will finish cooking on its own and arrive at exactly the right place.
Science calls this carryover cooking. I call it the thing that separates good churrasco from dry churrasco.
4. Keep the Skewers Moving
Churrasco is not set and forget cooking. The skewers rotate. This is not tradition for its own sake, it is technique.
Constant rotation does several things. It prevents the side facing the fire from overcooking while the other side stays raw. It allows the fat cap on cuts like picanha to baste the meat from multiple angles as it renders. And it gives you continuous feedback on how the cook is progressing.
If you have a rotisserie on your churrasqueira, use it. If you are turning manually, do not walk away. The grill rewards attention.
5. Rest the Meat Before Slicing
Every cut benefits from a brief rest off the fire before you slice it. In traditional Brazilian churrasco this is not the long rest you associate with American low-and-slow barbecue. The gaucho pulls the meat and brings it around almost immediately. But even a brief minute or two of settling makes a difference.
During cooking the internal juices move toward the exterior under heat pressure. When you slice immediately those juices run straight onto your cutting board. Even a short rest allows them to begin redistributing through the interior. You get a moister, more flavorful slice.
For whole cuts like picanha the gaucho slicing method handles this naturally. You are slicing the exterior as it finishes, serving it immediately, and the remaining cut stays on the fire. For cubed cuts a short rest of two to three minutes is enough. The goal is not a long hold, just enough time for the meat to settle before the knife goes in.
6. Slice Against the Grain, Always
For fraldinha especially this is non-negotiable. Slice with the grain and you are cutting along the muscle fibers, which makes every bite feel tough and chewy. Slice against the grain and you are cutting through the fibers, which shortens them and makes the meat feel tender.
Take a moment before you slice to identify the direction the muscle fibers run. Then cut perpendicular to them. On fraldinha the grain is easy to see. On picanha it runs diagonally through the cut, so orient your knife accordingly.
7. Use the Pineapple Strategically
Grilled pineapple is not a dessert item at churrasco. It is a palate cleanser and a digestive tool, and it belongs between rounds of meat, not at the end of the meal.
Pineapple contains bromelain, an enzyme that breaks down protein and aids digestion. Brazilians have understood this intuitively for generations. A slice of grilled pineapple between the picanha and the fraldinha resets your palate and genuinely helps you enjoy more food.
For the pineapple itself: marinate thick slices or spears in brown sugar before they go on the grill. I make my own brown sugar by adding molasses to white sugar, which gives a deeper, more complex flavor than store-bought. Cook over high heat until caramelized on both sides. Then, just before serving, a light dusting of finishing salt. The contrast between the caramelized sweetness and the salt is outstanding.
8. Do Not Overthink the Seasoning on Red Meat
Picanha does not need a marinade. Fraldinha does not need a rub. Linguiça is already seasoned by the maker.
Coarse salt and fire. That is the tradition and it is correct. The cuts that define Brazilian churrasco were developed over generations by people who understood that great meat needs enhancement, not disguise.
The urge to add complexity is understandable, especially for American cooks who grew up with spice rubs and sauces. Resist it. Trust the dance between the meat and the fire. Salt opens the door. Flame does the rest. Once you have tasted a properly salted picanha off a live fire you will understand why Brazilians have never felt the need to improve on it.
9. Try Chicken Hearts at Least Once
This one is not for everyone and I am not going to pretend otherwise. But if you are serious about authentic Brazilian churrasco, coração de frango belongs on your list.
Season lightly with salt and garlic. Skewer and cook over medium-high heat. Carryover cooking applies here too so trust the thermometer rather than the visual. Pull them just before they look done and let them finish off the heat. Then, immediately before eating, squeeze fresh lime over them.
The lime is not optional. It is the entire point. The acid brightens everything and the combination of the charred exterior, the rich interior, and the fresh citrus is genuinely unlike anything else at the fire.
I am not currently offering chicken hearts at The Espeto Grill, but they are part of the tradition and they deserve a mention.
10. Experiment With the Cheese Bread
Pao de queijo, Brazilian cheese bread, is one of the most beloved things to come out of Brazil and one of the most forgiving recipes to experiment with.
My base recipe uses the traditional tapioca flour and a standard mild cheese. But over the years my wife and I have tried nearly everything: parmesan from a standard grocery store, aged parmesan from a specialty market, a Mexican-style cheese from the Hispanic grocery, and at one memorable point, extra sharp cheddar. That batch tasted like Cheez-Its. It was not something I would sell but it was genuinely delicious in its own way.
The point is that the base recipe is a platform. The tapioca flour gives you the texture. The cheese gives you the flavor. Change the cheese and you change the entire character of the bread without changing anything else.
Start with the base recipe. Then experiment. You will find a version that becomes yours. And if you ever want the Cheez-It batch, we have been known to take special orders.
Frequently Asked Questions About Brazilian Churrasco Technique
What is the best salt for Brazilian churrasco? It depends on the cut. Flake salt works beautifully on thick cuts like picanha because the larger crystals adhere to the surface and create an exceptional crust. Table salt is better for garlic sirloin cubes where fine distribution matters more. Traditional Brazilian sal grosso is always a solid choice for any cut.
How do you know when churrasco meat is done? For cubed cuts like garlic sirloin, pull the meat when you are uncertain whether it needs more time. Carryover cooking will finish it perfectly. For whole cuts like picanha, use a thermometer and pull at 130 to 135 degrees Fahrenheit for medium-rare. For chicken thighs, pull at 160 degrees and let carryover bring it to 165.
Why does my churrasco come out dry? The two most common causes are cooking over a single heat zone without a sear and finish setup, and slicing too soon without resting. A proper two-zone fire and a five to ten minute rest before slicing will solve most dryness problems.
Do you need a special grill for churrasco? A dedicated churrasqueira produces the best results but is not required. A standard charcoal kettle grill with a two-zone coal setup and metal skewers produces excellent churrasco. The fire source matters more than the grill style. Use charcoal or hardwood, not gas.
What is dry brining and should I do it for churrasco chicken? Dry brining means salting meat and letting it rest uncovered in the refrigerator before cooking, typically overnight. For chicken thighs it dramatically improves moisture retention and texture. Use less salt than you think you need and give it the full rest time. For a Saturday cook I use a blend of salt, pepper, garlic, and sometimes a special mix with paprika and powdered bay leaves. Dry brining is something I do for personal cooks where I have more prep time.
Why do Brazilians serve pineapple with churrasco? Grilled pineapple serves two purposes at churrasco. It acts as a palate cleanser between different cuts of meat, and it contains bromelain, a natural enzyme that aids in protein digestion. Brazilians traditionally serve it between meat courses rather than at the end of the meal.